10 Easy Christmas Gifts to Sew (That Don’t Look Handmade in a Bad Way)
I love Christmas. I put my tree up on the 1st of November, because I need to stretch the whole thing out for as long as I possibly can. I buy gifts throughout the year, picking up things I know people will love and putting them away for later, some second hand, some new, some caught on offer at exactly the right moment. I prepare, I decorate, I enjoy every bit of it I can.
The one place I always feel I could do better is homemade gifts. I get overwhelmed and don’t know where to start, so this year I’m starting now. I’ve gone through my list of friends and family and worked out what I actually want to give them: simple, thoughtful and, most importantly, useful.
I don’t like giving a personalised gift that ends up at the back of a cupboard. It’s a bit like giving a teacher a mug that says “teacher” on it. Nice thought, nowhere to go. So this list is built around gifts people will actually use, not just admire once and put away.
This is what I’ve settled on, and I hope it’s as useful for you as it has been for me. Some of these I’ve made before, some I’m dying to try for the first time. If you’re frugal, thrifty and hopelessly in love with Christmas, I think you’ll love these too.
Why a handmade gift still works
A shop gift says you spent money. A handmade one says you spent time, which is a different kind of currency and, for most people on your list, the better one. None of the ten below take a weekend. Most are scrap-fabric projects, so you’re not buying a metre of anything new for a five-minute lavender bag.
They also don’t scream “homemade” in the way that puts people off giving handmade gifts in the first place. Good fabric, a clean finish and a bit of restraint on the fussy details get you a long way. Nobody needs to know it took twenty minutes.
The 10
1. Christmas scrunchies
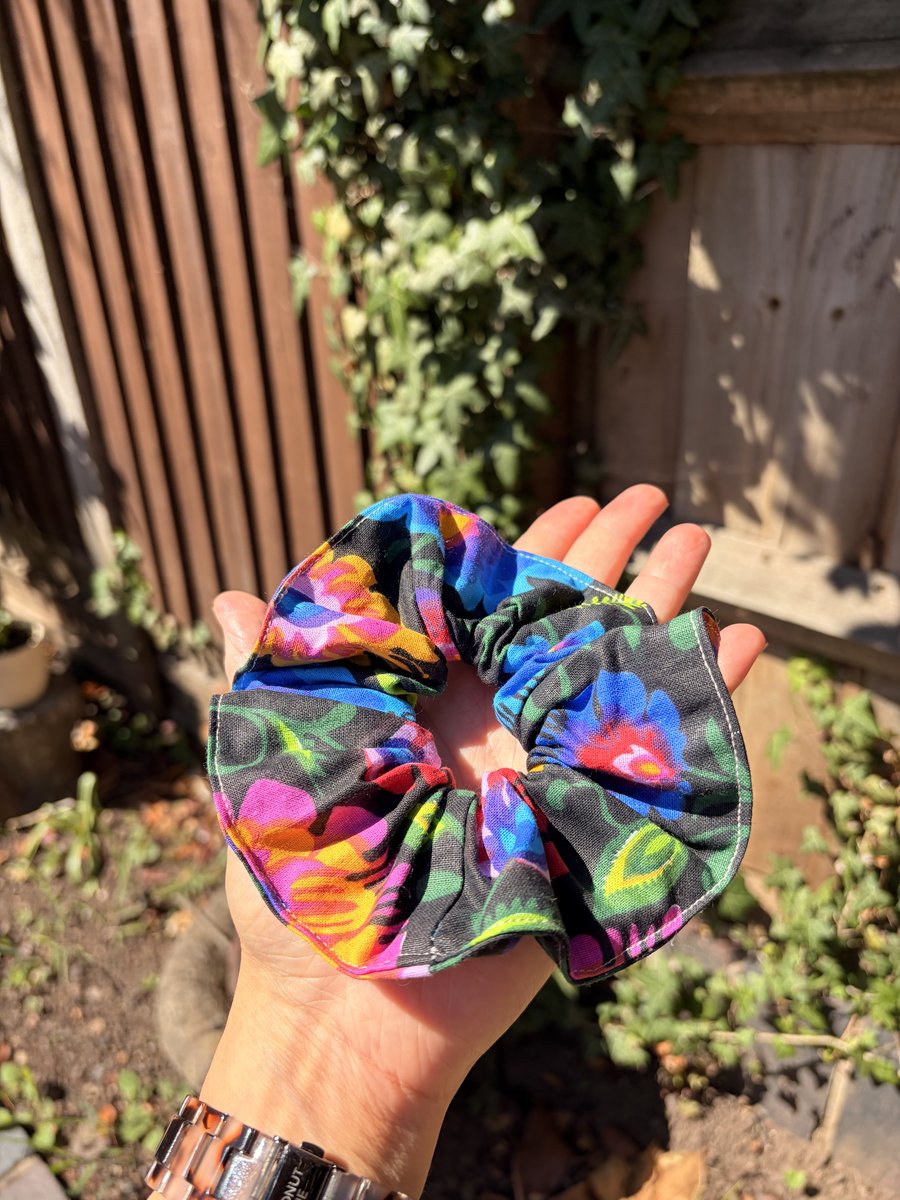
A five-minute sew from scraps, and they make a proper stocking filler once you’ve got a system going. I already have a full tutorial for these, so rather than repeat myself here, I’ll point you to How to Sew a Scrunchie, including the sizing fix for the oversized-scrunchie problem most patterns have. Swap in a Christmas print and the exact same five-minute method earns its place as gift number one on this list.
2. A drawstring bag that doubles as a shoe bag
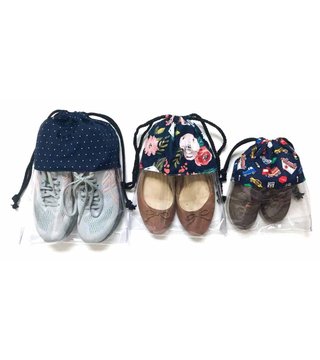
This is the one I’m most pleased with. A drawstring bag is already a good gift, wrapping paper you don’t throw away, but sized right it becomes something people actually keep using long after Christmas: a shoe bag for packing a case.
I’ve based the sizing on MindyMakes’ drawstring shoe bag pattern, which comes in three sizes and checked out when I ran the numbers myself. Cut two rectangles of your main fabric roughly 11.5in x 8.5in (a quarter metre easily gives you a pair) for a bag that fits most trainers, wedges and men’s shoes. Going smaller, around 10in x 8in, suits flats, flip-flops and children’s shoes, so if you’re making a few, it’s worth sizing at least one down. A half-inch seam allowance is comfortable for both.
Sew the two rectangles right sides together down both sides and across the bottom, leaving the top open. Fold the top edge down half an inch, then fold again by a full inch to make the drawstring channel, and stitch it down close to the folded edge, leaving a small gap to thread the cord through. A metre of cotton cord or ribbon is plenty for the drawstring, threaded through with a safety pin.
Finish the raw edges with a zigzag or an overlocker if you have one, since this bag will get used and washed. MindyMakes’ own version sets a strip of clear vinyl into the bottom so you can see which shoe is inside without opening every bag, worth a look at her full tutorial if you want to take it that far. I kept mine in fabric throughout, and a lining that contrasts with the outer looks deliberate rather than like you ran out of fabric partway through.
3. A key fob wristlet
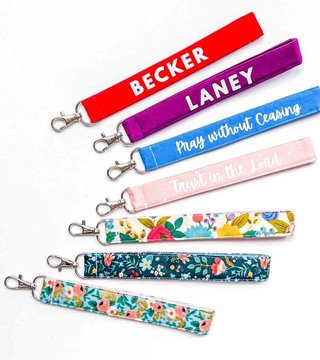
This is the gift equivalent of a stocking filler that people genuinely use, on a bag, in a car, on a set of house keys. It’s also one of the fastest things on this list.
I used MindyMakes’ key fob tutorial for this one, a proper ten-minute project once your fabric’s cut. Cut a strip of fabric 15in x 2in, fuse a strip of interfacing along the centre crease for a bit of body, then fold and press the strip lengthwise. Thread the fabric through a lobster clasp (hers is 0.78in to 1in wide, which suits most keyrings and bag zips) and stitch the short ends together to close the loop. Topstitch about an eighth of an inch from the edge around both sides to hold the layers together, and add a reinforcing stitch just below the clasp so it doesn’t work loose with use.
Batch a handful from the same fabric and you’ve solved several stockings at once.
4. Corner bookmarks
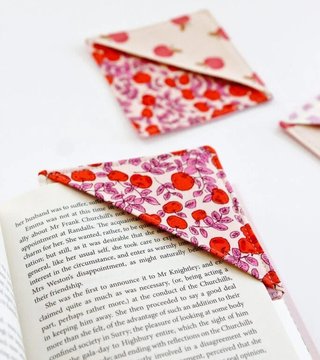
These slot over the corner of a page like a little triangle hat, and they’re the easiest thing on this whole list to batch, since each one uses a single 4.5in square of fabric.
The construction here follows See Kate Sew’s corner bookmark pattern almost exactly, it’s a clean, well-tested little pattern and there wasn’t much I’d change. Cut three 4.5in squares (two for the fabric front and back, one for a layer of fusible interfacing to give it some body), fold one square in half diagonally to make a triangle and topstitch the fold. Layer that folded triangle onto a full square with right sides together, stitch around with a quarter-inch seam, leave a small gap for turning, then turn right side out and topstitch an eighth of an inch from the edge to close the gap and finish it neatly. A scrap that’s too small for almost anything else is exactly the right size for one of these.
5. A bowl or mug cozy
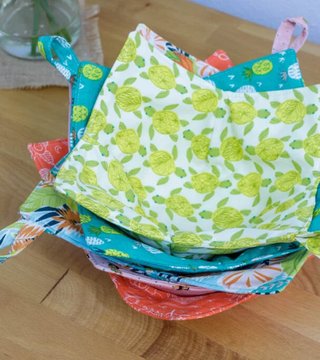
This is the gift for the person on your list who lives in leggings from November onwards. A mug cozy needs no special materials, just an outer fabric, a soft cotton lining and a layer of wadding for a bit of padding. A bowl cozy is the same idea scaled up and worth making if the person you’re gifting it to actually eats soup on the sofa (mine does, in front of the same four seasons of a show she’s watched more times than she’d admit to).
I’ve followed SewCanShe’s bowl cozy pattern for the shape and sizing, three sizes depending on the bowl: 10in for small, 10.5in for medium, 11in for large, cut as squares with a matching square of insulated wadding. The tutorial calls for Pellon’s Wrap-N-Zap, which isn’t easy to find in the UK. Vlieseline Thermolam heavyweight wadding does the same job and is usually cheaper and easier to get hold of here, so that’s what I’d use instead. One layer is genuinely enough, you don’t need to double it up. If this one’s going in the microwave rather than just holding a hot bowl at the table, keep every layer 100% cotton, cotton thread included, since anything synthetic risks sparking.
Quilt the wadding sandwich lightly (straight lines are fine), then cut small dart notches at the top and bottom of the folded edges and stitch the darts on both the outer and lining pieces. That’s what gives the finished cozy its cupped shape rather than a flat pocket. Join the two halves right sides together, leaving a gap to turn through, then turn right side out, add a fabric loop for hanging if you’d like one, and topstitch the opening closed.
6. A quilted boxy make-up bag
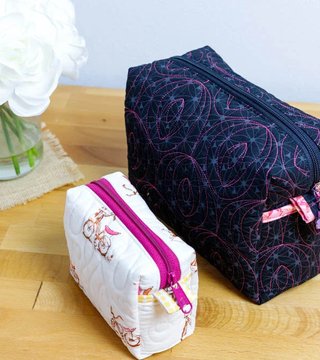
The one make-up bag people actually reach for is the one that stands up on its own. SewCanShe’s boxy zipper pouch pattern gets you there with a neater method than the usual fold-and-box approach: rather than sewing straight seams and boxing the corners afterwards, you mark and cut the corner shape into the fabric before you sew, so the box shape is built in from the start.
Cut two rectangles of quilted outer fabric (or a plain fabric with a layer of light wadding fused or quilted onto the back) 7in tall by 12.5in wide, and the same again in lining. On the wrong side, mark a line 1.75in up from the bottom and 1.25in down from the top, then a vertical line 3.25in in from each side edge, and cut away the four small rectangles where those lines cross at the corners. Trim the top edge down so it measures 8.5in wide, leaving the bottom at the full 12.5in, which is what gives the bag its slight taper. Sew a 9in zip (a wide handbag zip, YKK size 4.5 if you can get it, sits better than a narrow dressmaking one) across the top of the outer pieces and again across the lining, joining everything into one long strip: outer, zip, outer.
Fold right sides together and stitch down the shaped sides, matching the cut corners up so they form the box as you go, leaving a small gap in the lining to turn through. Turn right side out through that gap, push the corners out properly, and topstitch the gap closed. It finishes at roughly 6in wide, 4.5in tall and 3in deep, generous enough for someone’s everyday make-up without being bulky to wrap.
7. A Christmas gift tote, sized to be reused
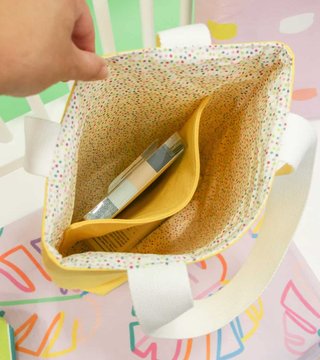
This is the wrapping-that-isn’t-wrapping idea again, but bigger. Sweet Red Poppy’s tote bag pattern comes in five sizes, and the medium is the one I’d use here, finishing at roughly 15in x 15.5in, close to what I’d have sketched out myself. A simple tote with two fabric rectangles, two straps and a boxed bottom (the same boxed-corner idea as the make-up bag above, just at a bigger scale) turns into a proper shopping bag once Christmas is over, so it’s a gift that keeps earning its keep rather than getting folded into a drawer with the tissue paper.
The straps are fabric rather than webbing: fold a strip lengthwise right sides together, stitch along the long edge, trim the seam allowance, turn right side out and topstitch both long edges, which gives a finished look on both sides rather than a raw strap. Box the bottom corners by aligning the side and bottom seams at each corner, pinning across the raw edge, stitching with a 3/8in seam allowance, then trimming away the excess to reduce bulk. The exact cutting dimensions for the panels come from Sweet Red Poppy’s downloadable PDF (free, just needs an email address), worth grabbing before you cut rather than guessing from the finished size alone. A sturdy cotton canvas or duck cloth holds its shape best for something meant to carry shopping.
8. Small felt crowns, hand-cut, for the cracker drawer
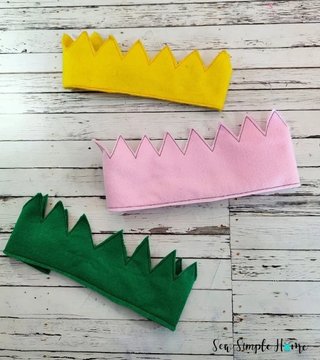
I’m properly getting into felt crowns as a project for my daughters’ birthdays later, but this is the small, low-stakes version, no cutting machine needed, just a printed pattern and a pair of sharp scissors.
I’ve used Sew Simple Home’s felt holiday crown for this one, a much nicer stand-in for the flimsy paper crown that comes in a Christmas cracker. Print her free template, cut two crown shapes from felt (gold, red and cream all work well for a Christmas table), then thread about 8in of 1in-wide elastic through the slots on each side, sandwiched between the two layers. Stitch the two crown pieces together and over the elastic ends to hold everything in place, then trim any stray threads once it’s sewn so the edges look neat.
The elastic is what makes it properly adjustable, so one crown can flex to fit a table full of different-sized heads rather than needing to size each one individually. Do a few in different colours and you’ve got the whole table sorted without a single soggy paper crown.
9. Lavender bags, from stash or from a five-minute kit
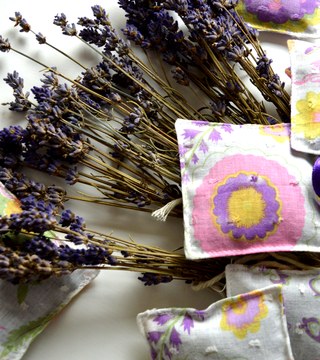
I put fresh lavender bags in every wardrobe in the house, so this one’s personal. A small envelope bag in a scrap of linen or cotton, filled with dried lavender, is a five-minute sew and a gift that keeps working long after Christmas is over.
For the size and method, I went with Bernina’s lavender sachet tutorial, a neat, well-proportioned little sachet. Cut two 10cm squares (about 4in) with a 1cm seam allowance built in, so the finished bag comes out around 9cm square. Pin right sides together and stitch around at 1cm, leaving a 2.5cm gap on one side for filling. Trim the corners, turn right side out, press, then fill with a couple of tablespoons of dried lavender per bag before closing the gap, an edgestitch foot makes this last bit tidy but it’s not essential.
If you’re short on time, buy a few small empty muslin or organza sachets (widely available on Amazon UK, a pack of ten or twenty comes in under a fiver) and fill and tie those instead, no sewing needed. Either way, a handwritten tag with the person’s name turns a five-minute fill-and-tie into something that still feels like a gift rather than a shortcut.
10. Christmas cloth napkins, personalised
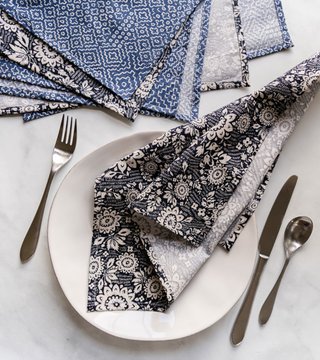
Straight seams, start to finish, which makes this the project to hand to someone who’s nervous about sewing for the first time.
I’ve taken the sizing and the neat mitred corner from Suzy Quilts’ cloth napkin tutorial, 17in squares finished (a fat quarter trims down to this nicely, so it’s an easy stash project too). Fold in all four edges a quarter inch, then a quarter inch again to land on a half-inch double hem, and press. Her trick for the corners is worth adopting even outside this project: trim the corner tips, glue-baste the folded hem in place with a dab of fabric glue and heat-set it with the iron before you sew, which gives you a crisp mitred corner without pins working loose as you go. Stitch around the hemline close to the edge, pivoting neatly at each corner.
The personal touch is where this one earns its place on a gift list. If you don’t have an embroidery machine, a hand-stitched initial in backstitch or satin stitch in one corner is simple enough for an evening in front of the television, and there are plenty of alphabet templates online to trace rather than freehand. A cut appliqué letter from a contrasting scrap, fused on and stitched around the edge, is quicker still and gives a bolder look. For the full family-Christmas-table version, do one napkin per person with their first initial, or go further and stitch each person’s surname if you want it to properly look intentional.
One more, if you don’t mind a translation

There’s an eleventh idea, if you want it: a sleep mask, from the free antifaz pattern already on the blog. That page is written entirely in Spanish, since it was put together for a Venezuela relief sewing project, so you’ll want to run it through your browser’s translate function to follow the instructions. The pattern itself isn’t mine, it’s from another creator, credited within that post, but it’s a lovely simple one-piece design and works exactly the same way for a Christmas gift as it does for a donation pile. A soft flannel or brushed cotton in a Christmas print turns it into something anyone would actually use on Boxing Day, curtains-open, sun-in-your-eyes and all.
FAQ
Do I need a sewing machine for all of these? Most go much faster on a machine, but the lavender bags, corner bookmarks and napkin hems are all realistic to hand sew if that’s what you’ve got.
What if I don’t have scrap fabric built up yet? A fat quarter bundle covers several of these easily, the key fob, corner bookmarks and lavender bags barely use any fabric each.
How early should I start these for Christmas? Earlier than you’d think, especially if you’re making more than one of anything. I’d start by late October so December stays for wrapping, not sewing.
Can beginners really finish all ten? The corner bookmarks, key fob and lavender bags are the easiest three on this list, good ones to start with if you’re newer to sewing.
Sign-off
If you make any of these, tag @caramba.crafts. I’d love to see which one you picked, and whether the shoe bag idea is as useful for you as it’s already been for me.